
Was mich schon eine ziemlich lange Zeit stört ist ein klapperndes Motorgeräusch, dass ich nur höre, wenn ich vor dem Kühler stehe. Außerdem hatte ich bei jedem Ölwechsel Bruchstücke von Sicherungssplinte gefunden. Es wird mal Zeit, dass ich mir das näher anschauen.
What has been bothering me for quite a long time is a rattling engine noise that I only hear when standing in front of the radiator. Also, I had found broken pieces of fuse splinters every time I changed the oil. It's about time I took a closer look.
What has been bothering me for quite a long time is a rattling engine noise that I only hear when standing in front of the radiator. Also, I had found broken pieces of fuse splinters every time I changed the oil. It's about time I took a closer look.
Zuerst lasse ich das Öl ab und entferne dann die 3 Verschlusskappen der Partikelfallen an der Revisionsklappe. Diese Partikelfallen sind nicht original, sondern eine Idee von Werner Straube. Ich muss sagen, dass diese sehr gut funktionieren. Beim ersten Ölwechsel hatte ich verschiedene Metallteile und Ölschlamm darin gefunden. Beim zweiten Ölwechsel gab es auch Metallteile und Wasser, dass sich darin abgesetzt hat. Mal sehen was ich heute darin finde.
First I drain the oil and then remove the 3 caps of the particle traps on the inspection door. These particle traps are not original, but an idea of Werner Straube. I must say that these work very well. At the first oil change I had found various metal parts and oil sludge in them. At the second oil change there were also metal parts and water that settled in it. Let's see what I find in it today.

Es ist kein Wasser oder Schlamm darin zu finden, aber das Bruchstück eines Sicherungssplintes.
There is no water or mud in it, but there is the fragment of a safety cotter pin.
There is no water or mud in it, but there is the fragment of a safety cotter pin.


Ich schraube die ganze Revisionsklappe ab und bin sehr überrascht. in der zweiten Partikelfalle hat sich ein Sicherungsdraht verfangen. Er hat einen Durchmesser von 1mm und eine Länge von 70mm. Ohne die Partikelfalle, wäre der Draht irgendwo sonst im Motor gelandet. Werner, deine Konstruktion ist sehr nützlich. Leider habe ich Moment keine Idee wo der Sicherungsdraht fehlt.
I unscrew the whole inspection flap and am very surprised. in the second particle trap, a safety wire has become entangled. It has a diameter of 1mm and a length of 70mm. Without the particle trap, the wire would have ended up somewhere else in the engine. Werner, your construction is very useful. Unfortunately, at the moment I have no idea where the fuse wire is missing.
I unscrew the whole inspection flap and am very surprised. in the second particle trap, a safety wire has become entangled. It has a diameter of 1mm and a length of 70mm. Without the particle trap, the wire would have ended up somewhere else in the engine. Werner, your construction is very useful. Unfortunately, at the moment I have no idea where the fuse wire is missing.


Werner hat bei der Instandsetzung des Motors die Ölwanne um die Revisionsklappe mit Silikon aufgefüllt, damit sich dort kein Ölschlamm mehr absetzen kann. Das funktioniert auch. Ich finde an diesen Stellen kein Ölschlamm. Allerdings gibt es noch zwei Bruchstücke der Sicherungssplinte.
When Werner repaired the engine, he filled the oil pan around the inspection flap with silicone so that no more oil sludge can settle there. This also works. I can't find any oil sludge in these places. However, there are still two broken pieces of the securing cotter pins.
When Werner repaired the engine, he filled the oil pan around the inspection flap with silicone so that no more oil sludge can settle there. This also works. I can't find any oil sludge in these places. However, there are still two broken pieces of the securing cotter pins.


Ich reinige die Revisionsklappe und bereite sie für den Einbau vor.
I clean the access panel and prepare it for installation.
I clean the access panel and prepare it for installation.


Tatsächlich fehlt beim dritten Pleuel ein kompletter Sicherungssplint und am vierten Pleuel Teile eines Sicherungssplintes. Die Schrauben sind aber noch fest angezogen.
In fact, the third connecting rod is missing a complete locking cotter pin and the fourth connecting rod is missing parts of a locking cotter pin. However, the screws are still tight.
In fact, the third connecting rod is missing a complete locking cotter pin and the fourth connecting rod is missing parts of a locking cotter pin. However, the screws are still tight.


Die Pleuel lassen sich von Hand axial verschieben. Ich kann kein radiales Lagerspiel feststellen, wobei man aber ein Spiel unter 0,05mm nicht mit der Hand spüren kann. Das Öl auf der Gleitfläche verhindert das. Die Lagerschalen sehen gut aus.
The connecting rods can be moved axially by hand. I can't detect any radial bearing play, although you can't feel any play below 0.05mm with your hand. The oil on the sliding surface prevents that. The bearing shells look good.
The connecting rods can be moved axially by hand. I can't detect any radial bearing play, although you can't feel any play below 0.05mm with your hand. The oil on the sliding surface prevents that. The bearing shells look good.


Die Lager werden übrigens mit Shims eingestellt. Shims sind Messing Unterlagsscheiben, die aus mehreren 0,05mm dünnen Bleche gepresst sind. Man kann mit dem Messer jeweils eine dünne Lage entfernen und so das Lagerspiel einstellen. Entfernt man nur eine Lage eines Shims, reduziert sich das Lagerspiel um 0,025mm. Das habe ich auch so gemacht und versucht die Lagertoleranzen zu reduzieren.
Ich konnte die Lagerspiele der ersten 3 Pleuel um jeweils eine Shimlage verringern. Bei mehr, konnte ich die Lager nicht mehr axial schieben, also habe ich es erst mal so gelassen. Ich werde noch mal im Reparaturhandbuch nachlesen ob das so richtig ist.
Ich konnte die Lagerspiele der ersten 3 Pleuel um jeweils eine Shimlage verringern. Bei mehr, konnte ich die Lager nicht mehr axial schieben, also habe ich es erst mal so gelassen. Ich werde noch mal im Reparaturhandbuch nachlesen ob das so richtig ist.
By the way, the bearings are adjusted with shims. Shims are brass washers pressed from several 0.05mm thin sheets. You can remove one thin layer at a time with a knife to adjust the bearing clearance. If you remove only one layer of a shim, the bearing clearance is reduced by 0.025mm. I did the same and tried to reduce the bearing tolerances.
I was able to reduce the bearing clearances of the first 3 connecting rods by one layer of shim each. With more, I could not push the bearings axially, so I left it that way for now. I will check the repair manual to see if this is correct.


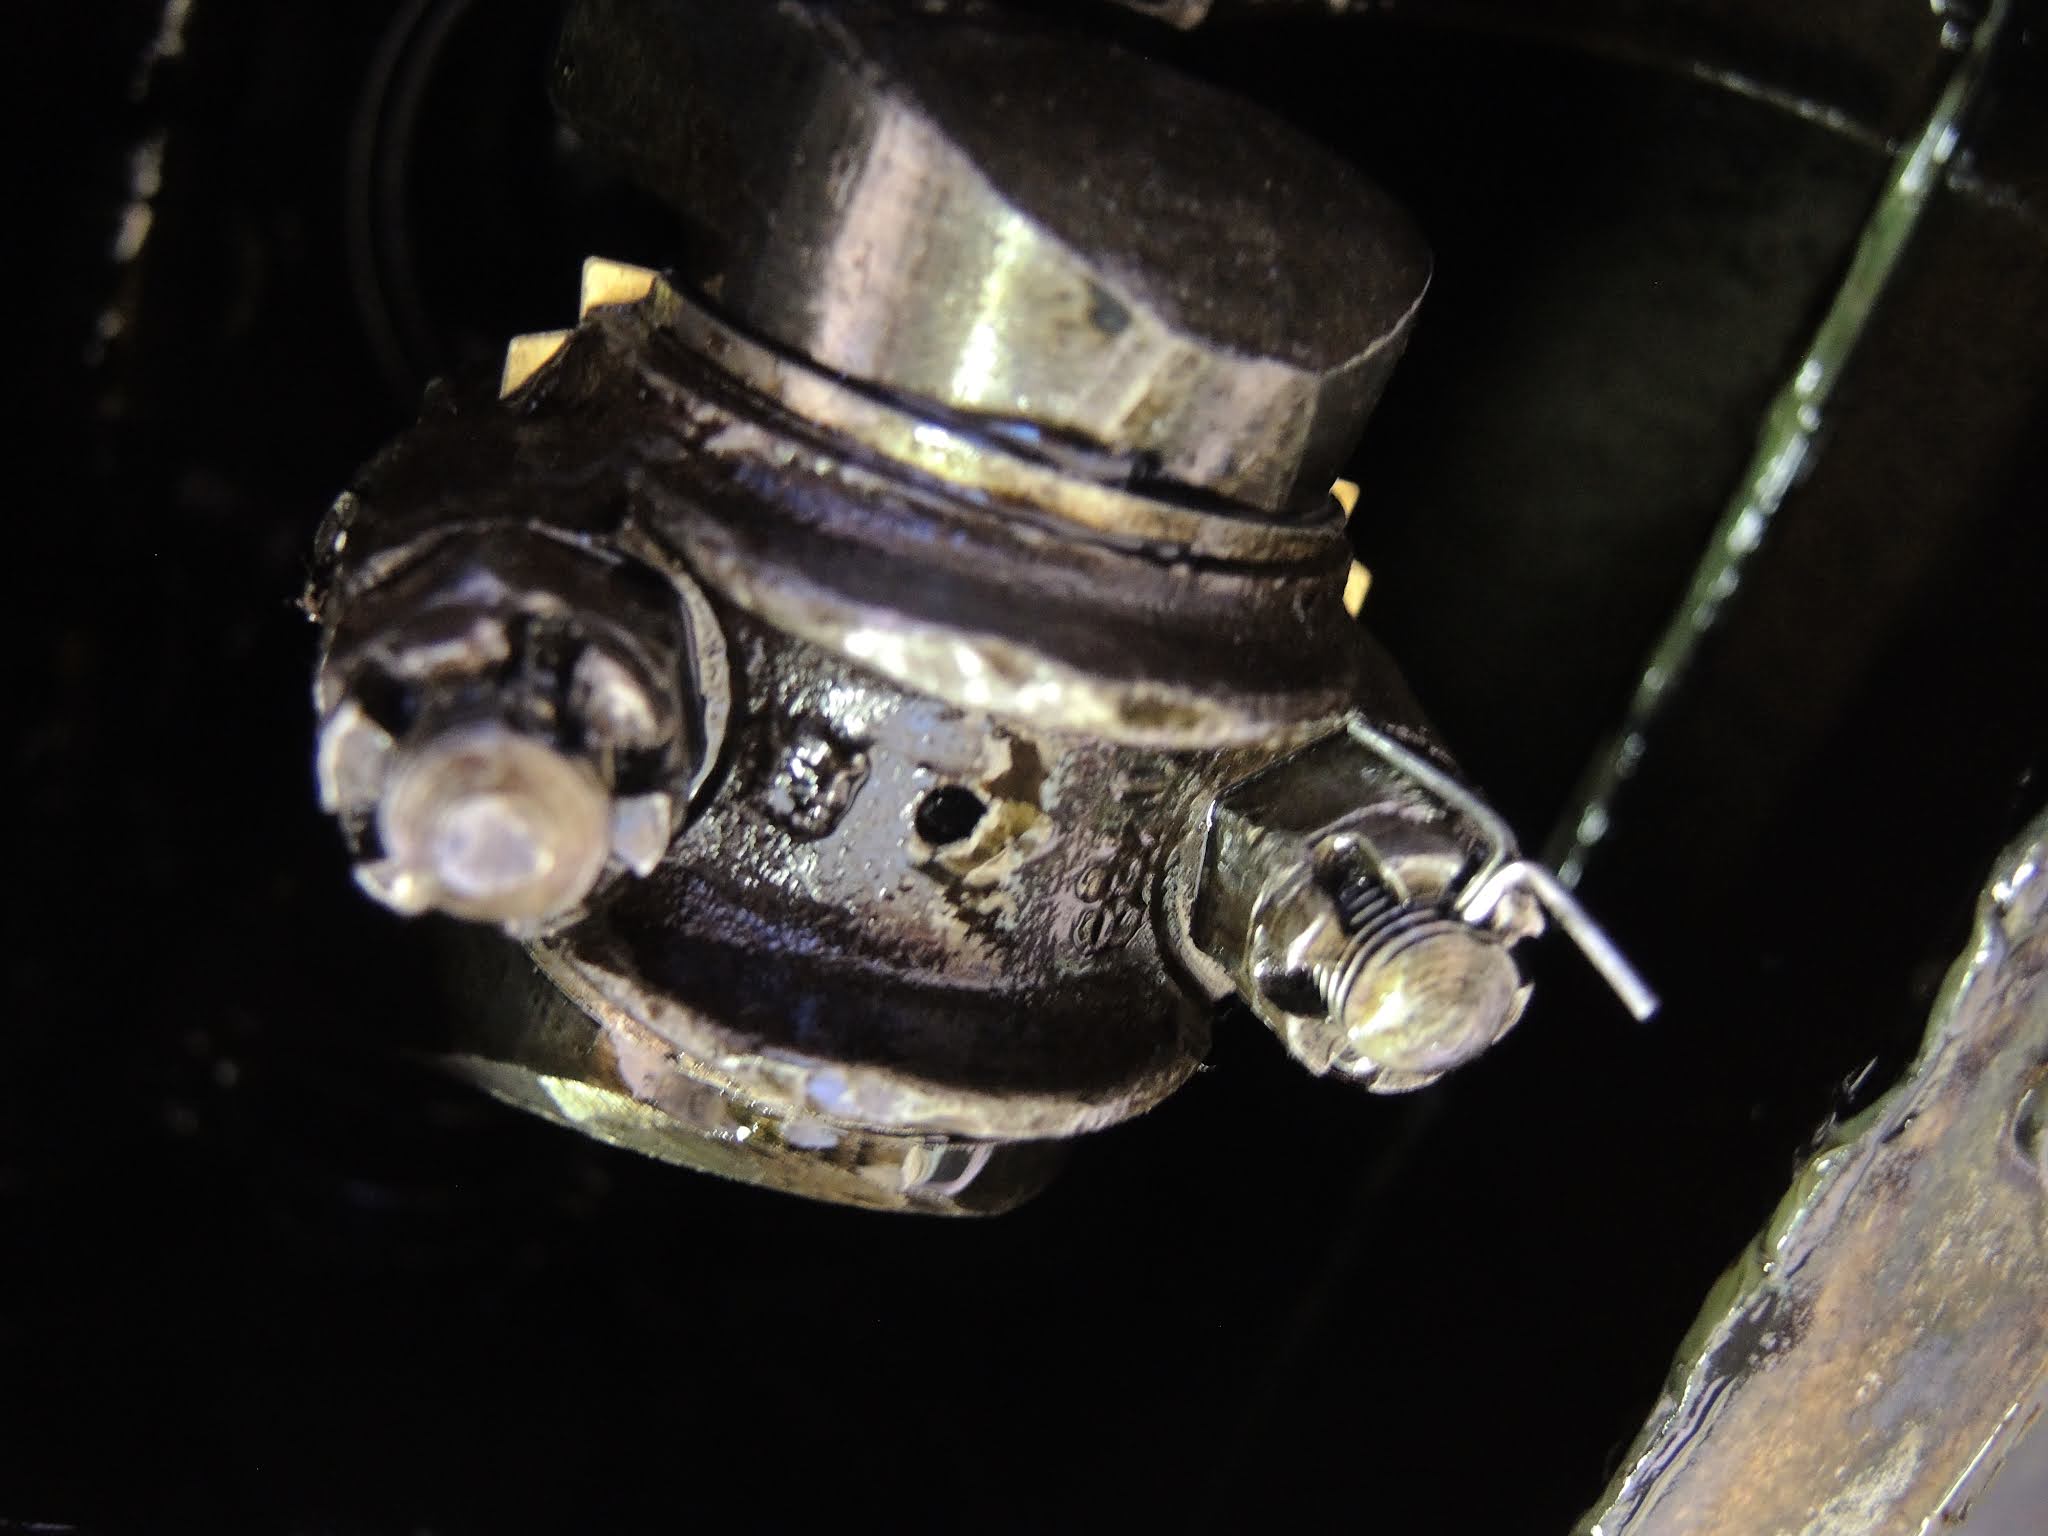
Hier habe ich noch einen Fehler gemacht, den ich anschließend korrigierte. Die Markierungen (eingeschlagene Punkte) auf den beiden Lagerschalen sollten auf der gleichen Seite sein. Der erste Pleuel und seine Schale sind jeweils mit einem Punkt gekennzeichnet, das zweite Pleuel mit 2 Punkten usw.. Die Markierungen befinden sich auf der rechten Seite. Auf dem ersten Bild sieht man also das 3. Pleuel, bei dem ich zuerst die Lageschale falsch montiert habe. Das zweite Bild zeigt das erste Pleuel mit richtig montierter Lagerschale. Auf dem zweiten Bild sieht man auch gut das Shim zwischen Pleuelstange und Lagerschale.
Here I made mistake, which I subsequently corrected. The markings (hammered points) on the two bearing shells should be on the same side. The first connecting rod and its shell are each marked with one dot, the second connecting rod with 2 dots, and so on. The markings are on the right side. So in the first picture you can see the 3rd connecting rod where I first mounted the bearing shell incorrectly. The second picture shows the first connecting rod with the bearing shell mounted correctly. On the second picture you can also see the shim between connecting rod and bearing shell.
Here I made mistake, which I subsequently corrected. The markings (hammered points) on the two bearing shells should be on the same side. The first connecting rod and its shell are each marked with one dot, the second connecting rod with 2 dots, and so on. The markings are on the right side. So in the first picture you can see the 3rd connecting rod where I first mounted the bearing shell incorrectly. The second picture shows the first connecting rod with the bearing shell mounted correctly. On the second picture you can also see the shim between connecting rod and bearing shell.


Jetzt wieder die Serviceklappe montieren. Ich habe zur Dichtung noch zusätzlich UHU Flächendichtung verwendet. Die Tube ist übrigens eine Mogelpackung. Sie ist nur zu einem Drittel gefüllt.
Now mount the service flap again. I also used UHU surface sealant for the seal. By the way, the tube is a deceptive package. It is only one third full.
Now mount the service flap again. I also used UHU surface sealant for the seal. By the way, the tube is a deceptive package. It is only one third full.


Beim Probelauf klappert der Motor subjektiv etwas weniger. Vielleicht bilde ich mir das aber auch nur ein.
Jetzt werde ich erst mal klären, wie eng man die Toleranzen der Pleuellager einstellt und woher der Sicherungsdraht stammt.
Jetzt werde ich erst mal klären, wie eng man die Toleranzen der Pleuellager einstellt und woher der Sicherungsdraht stammt.
Subjectively, the engine rattles a bit less during the test run. But maybe I'm just imagining it.
Now I will first clarify how tight the tolerances of the connecting rod bearings are set and where the fuse wire comes from.
Zurück aus der Werkstatt nehme ich mir das Ford Reparaturhandbuch und lese noch mal die Einstellung der Pleuellager nach: "Die Stange soll so auf die Kurbelwelle angepaßt werden, daß sie sich leicht auf der Welle bewegt, wenn der Lagerdeckel seitlich mit einem kleinen Messinghammer beklopft wird. Die Verschiebung der Stange auf der Welle kann bemerkt werden, wenn man einen Finger an die eine Seite des Deckels hält während man die andere Seite beklopft."
Das Lagerspiel ist also zu groß, wenn man die Pleuelstange einfach mit der Hand bewegen kann. Ich werde die Lager also noch einmal einstellen müssen.
Das Lagerspiel ist also zu groß, wenn man die Pleuelstange einfach mit der Hand bewegen kann. Ich werde die Lager also noch einmal einstellen müssen.
Ich habe auch gerade mit Werner telefoniert und ihm von dem klackenden Geräusch des Motors berichtet. Er hat mich darauf aufmerksam gemacht, dass von den 14 Schrauben der Revisionsklappe eine gibt, die kürzer ist. Diese muss hinten in der Mitte eingeschraubt werden, da eine lange Schraube mit der 4. Pleuellagerschale kollidieren könnte und dann genau so ein Geräusch verursachen könnte. Die kurze Schraube ist mir auch aufgefallen, war aber links vorn eingeschraubt. Ich bin gespannt, ob das die Lösung sein könnte.
Back from the shop, I take the Ford repair manual and reread the connecting rod bearing adjustment: "The rod should be adjusted to fit the crankshaft so that it moves slightly on the shaft when the bearing cap is tapped on the side with a small brass mallet. The shifting of the rod on the shaft can be noticed by holding a finger to one side of the cover while tapping the other side."
So the bearing play is too much if you can just move the connecting rod by hand. So I will have to adjust the bearings again. I also just got off the phone with Werner and told him about the engine clacking noise. He pointed out to me that of the 14 screws of the revision cover, there is one that is shorter. This one has to be screwed in the middle at the back, because a long screw could collide with the 4th connecting rod bearing shell and then cause exactly such a noise. I also noticed the short screw, but it was screwed in on the left front. I am curious if this could be the solution.


